If all those posts about Microsoft Fabric have made you excited, you might want to consider it as your next data platform. Since it is very new, not all features are available yet and most are still in preview. You could already adopt it, but if you want to deploy this to a production scenario, you’ll want to wait a bit longer. In the meantime, you can already start preparing for the migration. Let’s dive into the steps to migrate to Microsoft Fabric. Today: starting from Synapse Dedicated SQL Pools.

All posts in this series
Why should you migrate?
Before we start with the practical steps, let’s first look at why you should migrate to Microsoft Fabric. Fabric brings a ton more features than what you have in Synapse Dedicated SQL Pools. Microsoft also stated that Fabric will replace Dedicated SQL Pools . Microsoft lagged a bit behind the competition in modern cloud data warehouses and with Fabric they caught up to the likes of Snowflake, BigQuery, and Databricks. If you’re on Synapse Dedicated SQL Pools, and you’re not ready to migrate, you’re going to be fine for a while though. At the time of writing, Synapse Dedicated SQL is still the only Generally Available data warehousing product and is still fully supported. This will probably continue a lot longer in the future as Microsoft tends to have very generous long-term support policies.
The Synapse branding on the Data Warehouse and Lakehouse in Fabric might confuse some users. I went a bit deeper into the differences between the Synapse SQL Pools and the new Synapse engines in Fabric in my previous post .
With Fabric, you won’t have to deal with things like distribution settings, index settings, manually managing the capacity, complex workload management, and so on. The SQL engines in Fabric can scale seamlessly and automatically. You can focus on the data and the queries, not on the infrastructure.
Microsoft’s video below goes a bit deeper into the question of Will Fabric replace Azure Synapse?.
The steps to migrate
If we’re going to migrate Synapse Dedicated SQL to Fabric, there are 2 things we have to think about: migrating the data stored in the Dedicated SQL Pool and migrating the schema-like database objects (views, stored procedures, …). As Fabric Warehouses are T-SQL compliant (with some exceptions ), the migration of the schema is pretty straightforward. All you have to do is redeploy your views, stored procedures, and more to Fabric by redeploying them with a different connection string. The data migration takes some more effort and is what I’ll cover in this post.
CETAS to the data lake
In the first step, we’ll use the CETAS (Create External Table As Select) feature to export the tables to Parquet datasets in a data lake. This data lake is used as a staging area from which we can load the data into Fabric.
1. Create or repurpose a data lake
The first step is to create an Azure Storage Account with Hierarchical Namespaces enabled, meaning that you can use Azure Data Lake Storage gen2. You could also use the storage account associated with your Azure Synapse Workspace. You can read the Microsoft documentation on how to create such a storage account. Since Fabric does not support Microsoft Entra ID (Azure AD) authentication just yet, make sure to not disable the storage account keys. Prepare a folder or a container/filesystem in the data lake to use as a staging area.
2. Assign the right permissions
The Synapse Dedicated SQL Pool can use both Microsoft Entra ID (Azure AD) authentication through the use of its Managed Identity as well as Shared Access Signature (SAS) tokens to authenticate to the data lake. With the former, you have to assign the role Storage Blob Data Contributor (or the right Access Control List permissions) to the Synapse Managed Identity on the filesystem/container you’ll be using as a staging area. With the latter, you can generate a SAS token with the read and write permissions on the filesystem/container you’ll be using as a staging area.
3. Link the data lake to the Dedicated SQL Pool
Next, we’ll have to execute some SQL to register the data lake in the Dedicated SQL Pool so that we can use it as an external data source. If you haven’t created a Master Key or a credential to this data lake yet, then this is the time to do so.
More details on the possible authentication mechanisms can be found in the Microsoft documentation .
 1-- Optional: creates a master key if you don't have one
 2CREATE MASTER KEY;
 3
 4-- Create a credential that is authorized to write to the storage container.
 5-- You could also use a service principal or a SAS token here.
 6CREATE DATABASE SCOPED CREDENTIAL ManagedIdentity
 7WITH IDENTITY = 'Managed Service Identity';
 8
 9-- Set the format we're going to use.
10CREATE EXTERNAL FILE FORMAT SnappyParquet
11WITH (FORMAT_TYPE = PARQUET, DATA_COMPRESSION = 'org.apache.hadoop.io.compress.SnappyCodec');
12
13-- Set the location of the staging area.
14CREATE EXTERNAL DATA SOURCE MigrationStagingArea
15WITH
16  ( TYPE = HADOOP,
17    LOCATION = 'abfss://<container-name>@<storage-account-name>.dfs.core.windows.net' ,
18    CREDENTIAL = ManagedIdentity
19  );
20GO;
21
22-- Create the staging schema.
23CREATE SCHEMA migration;
24GO;
4. Assign workload capacity
In our next step, we’re going to extract all data from the Dedicated SQL Pool to the data lake. Since this is a long-running resource-intensive operation, it’s recommended to execute this during off-hours with proper workload management.
You could create a workload classifier to assign the workload to the built-in xlargerc group using the SQL query below:
1CREATE WORKLOAD CLASSIFIER [wgcTheCEO]
2WITH (WORKLOAD_GROUP = 'xlargerc'
3      ,MEMBERNAME = 'YourUserName' -- note that all database owners fall under 'dbo'
4      ,IMPORTANCE = HIGH);
5. Extract the data
The next SQL query extracts all data to the data lake and generates SQL commands which we’ll need in Microsoft Fabric to import the data. It’s recommended to execute this in a tool like SQL Server Management Studio or in Azure Data Studio to make sure the query runs to completion.
 1DECLARE @sql_to_execute NVARCHAR(MAX);
 2
 3CREATE TABLE #sql_to_execute
 4WITH (DISTRIBUTION = ROUND_ROBIN, HEAP)
 5AS
 6SELECT ROW_NUMBER() OVER(ORDER BY name ASC) AS row_no, CAST('
 7        CREATE EXTERNAL TABLE [migration].[' + OBJECT_SCHEMA_NAME(object_id) + '__' + name + ']
 8        WITH
 9          ( LOCATION = ''' + OBJECT_SCHEMA_NAME(object_id) + '/' + name + '/'',
10            DATA_SOURCE = MigrationStagingArea,
11            FILE_FORMAT = SnappyParquet
12          ) AS SELECT * FROM [' + OBJECT_SCHEMA_NAME(object_id) + '].[' + name + '];
13    ' AS NVARCHAR(MAX)) AS sql_to_execute
14FROM sys.tables WITH(NOLOCK)
15WHERE is_external = 0;
16
17DECLARE @stmt_count int, @counter int, @current_sql NVARCHAR(MAX);
18SET @counter = 1;
19SELECT @stmt_count = COUNT(*) FROM #sql_to_execute;
20
21WHILE @counter < @stmt_count
22BEGIN
23    SELECT @current_sql = sql_to_execute FROM #sql_to_execute WHERE row_no = @counter;
24    PRINT 'Executing ' + @current_sql;
25    EXECUTE sp_executesql @current_sql;
26    SET @counter += 1;
27END
28GO;
29
30WITH tables_with_column_expressions AS (
31    SELECT
32        t.object_id AS object_id,
33        STRING_AGG('[' + c.name + '] ' + REPLACE(REPLACE(REPLACE(REPLACE(REPLACE(UPPER(tp.name), 'MONEY', 'DECIMAL(19, 4)'), 'NVARCHAR', 'VARCHAR'), 'NCHAR', 'CHAR'), 'DATETIME', 'DATETIME2(6)'), 'TINYINT', 'SMALLINT') +
34        CASE
35            WHEN tp.name IN ('varchar', 'char', 'varbinary', 'binary')
36                THEN '(' + CASE WHEN c.max_length = -1 THEN 'MAX' ELSE CAST(c.max_length AS VARCHAR(5)) END + ')'
37            WHEN tp.name IN ('nvarchar', 'nchar')
38                THEN '(' + CASE WHEN c.max_length = -1 THEN 'MAX' ELSE CAST(c.max_length / 2 AS VARCHAR(5)) END + ')'
39            WHEN tp.name IN ('datetime2', 'time2', 'datetimeoffset')
40                THEN '(' + CAST(c.scale AS VARCHAR(5)) + ')'
41            WHEN tp.name = 'decimal'
42                THEN '(' + CAST(c.[precision] AS VARCHAR(5)) + ',' + CAST(c.scale AS VARCHAR(5)) + ')'
43            ELSE ''
44        END +
45        CASE
46            WHEN c.is_nullable = 1
47            THEN ' NULL'
48            ELSE ' NOT NULL'
49        END
50        , ', ') AS cols
51    FROM sys.columns c WITH(NOLOCK)
52    JOIN sys.types tp WITH(NOLOCK) ON c.user_type_id = tp.user_type_id
53    LEFT JOIN sys.check_constraints cc WITH(NOLOCK)
54    ON c.[object_id] = cc.parent_object_id
55    AND cc.parent_column_id = c.column_id
56    JOIN sys.tables t WITH(NOLOCK)
57    ON t.object_id = c.object_id
58    WHERE OBJECT_SCHEMA_NAME(t.object_id) <> 'migration'
59    GROUP BY t.object_id
60)
61
62SELECT '
63    CREATE TABLE [' + OBJECT_SCHEMA_NAME(object_id) + '].[' + OBJECT_NAME(object_id) + '](' + cols + ');
64    COPY INTO [' + OBJECT_SCHEMA_NAME(object_id) + '].[' + OBJECT_NAME(object_id) + ']
65    FROM ''https://REPLACEMEWITHSTORAGEACCOUNTNAME.blob.core.windows.net/REPLACEMEWITHPATH/' + OBJECT_SCHEMA_NAME(object_id) + '/' + OBJECT_NAME(object_id) + '/*.parq.snappy''
66    WITH (
67        FILE_TYPE = ''PARQUET'',
68        COMPRESSION = ''SNAPPY'',
69        CREDENTIAL = (IDENTITY=''Shared Access Signature'', SECRET=''REPLACEMEWITHSAS'')
70    );' AS load_into_fabric
71FROM tables_with_column_expressions;
Let’s go over this query step by step:
- First, we’ll go over every table in the Dedicated SQL Pool, prepare a CETAS command, and store it in a temporary table.
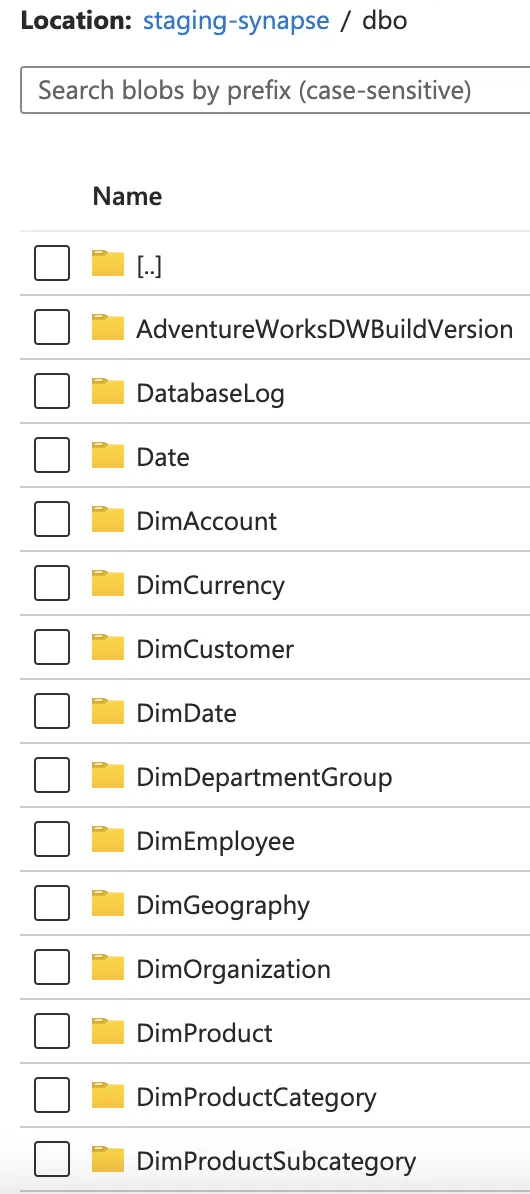
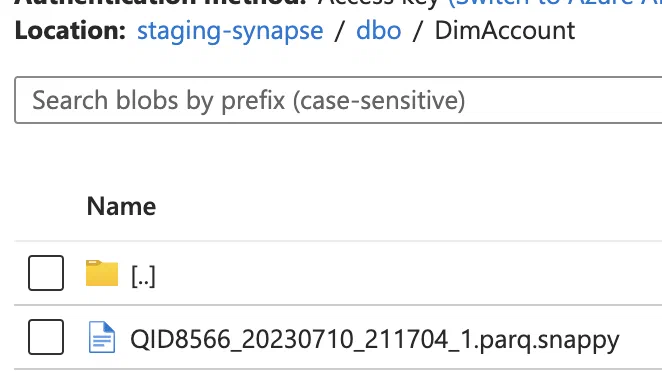
- Next, we’ll run every CETAS command one by one. This will create a table in the schema
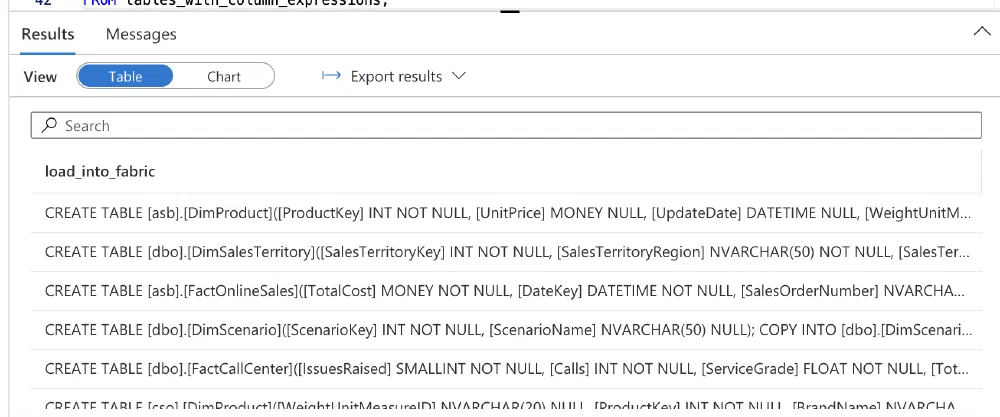
migrationwith the name<name of the schema>_<name of the table>. Synapse stores the data externally on the data lake in the foldermigration/<name of the schema>/<name of the table>. - When this is done, the script goes over every table again and generates a piece of SQL that can be used in Fabric to import the data again. This SQL consists of a simple
CREATE TABLEstatement and aCOPY INTOstatement. TheCOPY INTOstatement uses a SAS token to access the data in the data lake.
You can explore the data that the script created in the data lake to verify if all of the data is there.
When the script is done, store the resulting rows in a text file. We’ll need this in step 6.
6. Link the data lake to Fabric
So with all the data ready to go in our staging area, we can now import it into Microsoft Fabric. For this, we’ll be using the COPY INTO
SQL syntax.
A great feature of the script above is that it already generated 2 statements for every table for us:
- a
CREATE TABLEstatement to create the table in Fabric - a
COPY INTOstatement to import the data into Fabric
Note that the CREATE TABLE statement is a simple version that doesn’t include any constraints or indexes. Since constraints are generally a bad idea in OLAP databases, we’ll just ignore them for now. Indexes are not supported in the Warehouse at the time of writing.
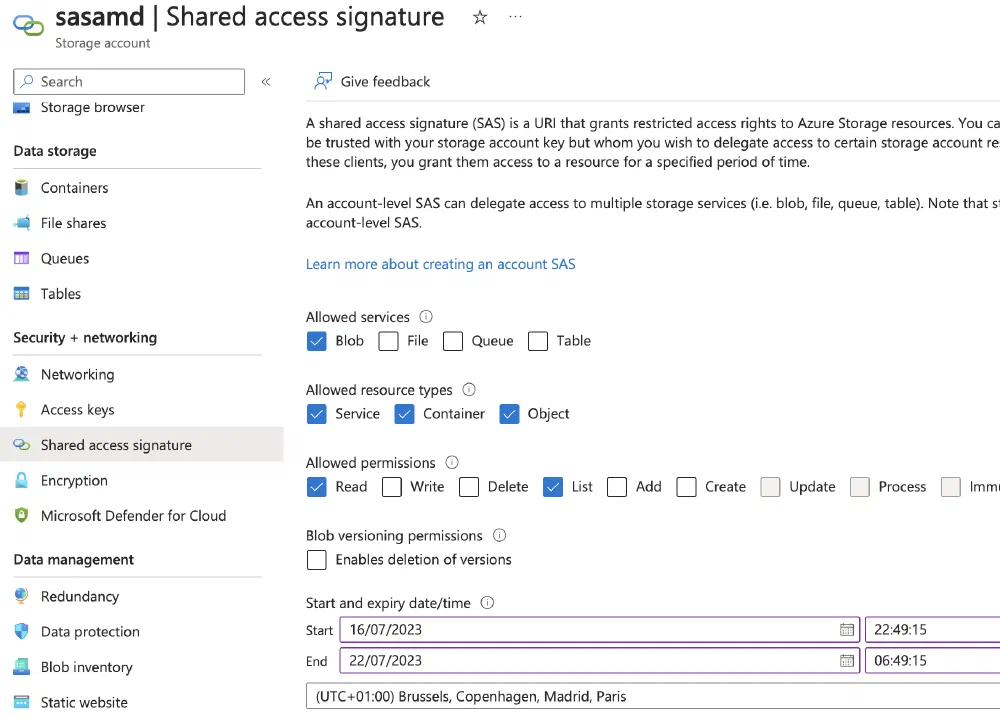
The COPY INTO statement requires a SAS (Shared Access Signature) token. There are various ways you can generate a SAS token, one is by using the Azure Portal. Go to the storage account that you created earlier, and click on Shared access tokens in the left menu. Make sure to include the Read and List permissions.
We’ll build a script based on the output from the previous step to run the 2 statements. Start by copying all the rows from the previous step into a SQL query editor. Then, replace the keyword REPLACEMEWITHSAS with the SAS token you generated. Make sure to prefix it with a ? character if it doesn’t have one yet. For example: ?sv=1234. Next, replace the keyword REPLACEMEWITHSTORAGEACCOUNTNAME with the name of your storage account. Finally, replace the keyword REPLACEMEWITHPATH with the path to the staging area (usually the name of your container/filesystem).
You would end up with a script like this:
 1CREATE TABLE [dbo].[DimScenario]([ScenarioKey] INT NOT NULL, [ScenarioName] NVARCHAR(50) NULL);
 2COPY INTO [dbo].[DimScenario]
 3FROM 'https://<your storage account name>.blob.core.windows.net/staging-synapse/dbo/DimScenario/*.parq.snappy'
 4WITH (
 5    FILE_TYPE = 'PARQUET',
 6    COMPRESSION = 'SNAPPY',
 7    CREDENTIAL = (IDENTITY='Shared Access Signature', SECRET='?sv=1234')
 8);
 9
10...
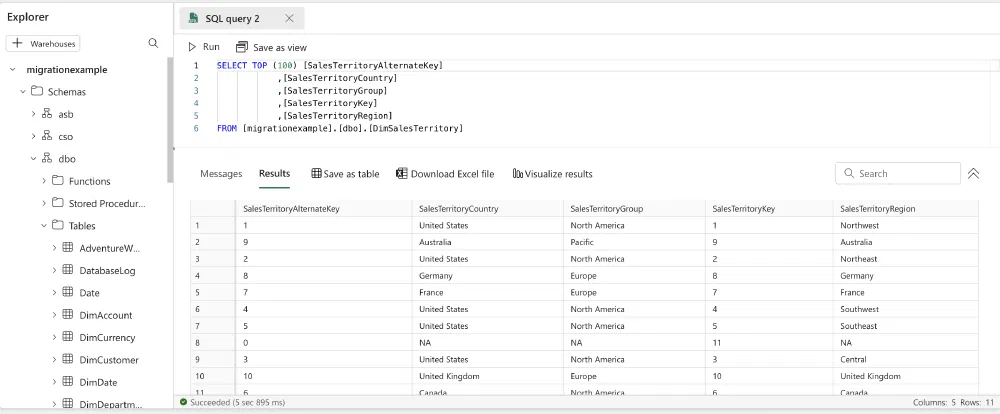
Depending on the size of your data, this script may take a while. It’s again recommended to use SQL Server Management Studio or Azure Data Studio to execute it. Once the load is done, you can instantly query your data in Fabric.
Bonus: instantly migrate all SQL views
You can extract all the definitions of the SQL Views using the query below:
1SELECT m.[definition]
2FROM sys.objects o
3INNER JOIN sys.sql_modules m
4    ON m.[object_id] = o.[object_id]
5WHERE o.[type] = 'V';

Then it would just be a matter of running these definitions again in Fabric to create the views.
Conclusion
In this blog post, we’ve seen how you can migrate your data from a Dedicated SQL Pool to Microsoft Fabric. As you can see in the script, there are some things we have to be aware of. Fabric’s data types are a bit different from the ones supported in Synapse Dedicated SQL. But in general, the migration is pretty straightforward. It’s not as simple as a click of a button, but it’s not rocket science either.